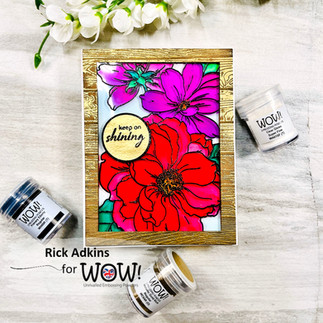
Creating Stunning DIY Cards: Stained Glass Technique with WOW Embossing Powders
- Rick Adkins
- Feb 26, 2024
- 3 min read
Updated: Apr 14, 2024
In todays blog post we will be talking about creating stunning DIY cards using the Stained Glass Technique with WOW Embossing Powders. This is actually a very easy technique but with the addition of WOW Embossing Powders it takes your handmade cards to the next level.

Creating Stunning DIY Cards: Stained Glass Technique with WOW Embossing Powders
the Stained Class Technique isn't as hard as you may think but it is a little tricky since you are going to be stamping on Heat Resistant Acetate. So, a stamp positioning tool (link the Misti or the Stamp Wheel will help to make it a little easier.) For my focal image and sentiments I used the Build-A-Garden: Blooming Delight Stamp Set along with the coordinating dies. (from Altenew). Along with Altenew Alcohol Markers for for the coloring (listed below in the Materials used section.)
(Wondering what I used in this video/project? Everything is linked to multiple sources in the thumbnails at the end of this post, or in the text below. Compensated affiliate links used when possible).
Two for One Gold Embossed Wood Frame:
For the frame for my Stain Glass Window pieces I started out with Kraft Cardstock cut my my A2 Layering Dies (I used my largest and the third in on my Layering Dies from Spellbinders this is Set B). Once I had the frame cut out I decided that I could use the inside piece for another card as well.

So I inked up my Woodgrain Embossing Folder with WOW Sticky Embossing Ink and placed the die cut frame and the inside piece in the folder and ran them through my die cutting machine. I then covered both with WOW Metallic Gold Rich Embossing Powder and heat set until smooth and melted.

Stained Glass Technique:
Once I had the frame and the panel nice and embossed it was time to work on the stain glass pieces. I placed my Acetate pieces into my Misti and stamped the large floral in WOW Sticky Embossing Ink and covered it with WOW Ebony Primary Embossing Powder. Then I heat set it with my WOW! Dual Speed Heat Tool until it was smooth and melted. Once the panels were cooled. I flipped them over and colored inside the lines with my alcohol markers.

I sandwiched the one panel inside another frame I cut from white cardstock and attached it to my card base with a little 1mm Foam Tape to lift it up off the card. For the second card I fussy cut the large flower out and attached it to the wood grain panel with the tiniest dots of liquid glue. Then popped the whole panel up with foam tape.

For the sentiments I covered two scraps of white cardstock with embossing ink and covered one with WOW Ebony Embossing Powder and the other with WOW Polished Gold Super Fine Embossing Powder. And heat set both until smooth and melted. Once they where cooled I could then die cut from the panels. So I cut a circle from both (one slightly larger) and on the smaller one I stamped my sentiment in black pigment ink and then covered it with WOW! Clear Gloss Embossing Powder and heat set it. I layered the two circles together and placed on the framed card. For the other card I simply die cut the shadow from the Ebony panel and the word die from the Gold panel and layered them together before placing them on the card.

And there you have it! That's how I created both card for today. I have a gallery below with more pictures of today's two cards.
Creating Stunning DIY Cards: Stained Glass Technique with WOW Embossing Powders Photo Gallery:
Pin Me:
Follow me on Pinterest and save this image to your favorite card making board!

Materials Used:
Here you will find the list of supplies that I used to create today's card. All supplies are linked to supply sources below. Compensated affiliate links may be used at no cost to you.
Happy Stampin'

Rick Adkins


Comentários